As more and more events begin to take advantage of our geofencing feature, here is our comprehensive guide explaining the ins and outs of geofencing.
What is Geofencing?
Geofencing is a safety and privacy feature that lets a participant temporarily hide their live location from public viewers on one of our tracking maps. When used, the map will show the participant as “geofenced” and you will only see the last known point they sent before entering the geofenced area. This helps blur their precise location while it is activated.

How it works
Activation
The participant presses and holds the central function button on their tracker (only our Queclink trackers support geofencing) for several seconds to start geofencing. The tracker should vibrate to confirm the geofence has activated. This sets a circular geofence around their current position – typically a couple of kilometres in size.
Inside the Geofence
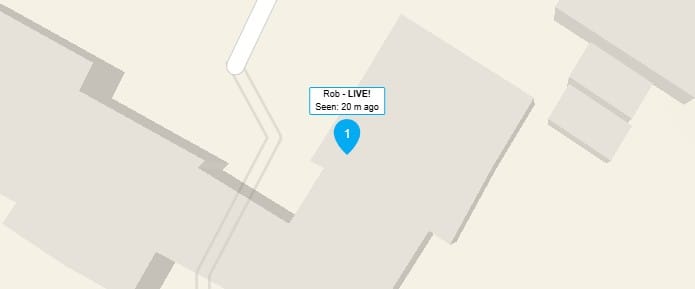
While inside the geofenced area zone, new position updates for that participant are not shown on the public map. Instead, the map shows only their last location from before geofencing began. Their dot will be labelled as “geofenced” on the map and in the Details tab.

For Organisers
Event organisers logged in via the map manager can still see the live position of the participant while they are geofenced, as well as the position being displayed on the public map.
Leaving the Geofence
Once the participant moves outside the geofenced area, their location begins updating on the map again. Previously hidden tracking points will also become visible again. This allows others to verify the track later if needed.
Can all events use it?
No, it is only available to events using our Queclink trackers, so events using satellite trackers, such as SPOT or inReach devices, cannot enable it.
Otherwise, all events can opt to use it. But we would recommend bearing in mind a few key considerations first (see below) as an organiser before opting in.
Things to consider as an organiser
Communication
It’s important to communicate to participants that geofencing is enabled and how it works. Often, people unfamiliar with our trackers will hold down the function button thinking it is a power button, which will activate the geofence accidentally if it is enabled. Similarly, those who haven’t read the instructions often assume you press the button to deactivate geofencing, which will actually trigger it again.
Therefore, it’s really important that you share our tracker instructions with participants and emphasise that you have chosen to enable geofencing. By making sure they are well informed, you are also ensuring they can take advantage of this safety feature effectively.
Route and EVent Suitability
Most events are suitable for geofencing, but there are a small number of looped formats where it might cause problems. If participants are likely to pass through the same spot several times, then you need to consider that geofencing once will hide all future data as well. It may be that this doesn’t matter, but it is worth bearing in mind.
Alternatively, if your route sticks to quiet areas with little in the way of habitation, you may feel that geofencing brings no real safety benefits and will only inconvenience dotwatchers.
Map Manager Access
As an organiser, you will be able to see participants locations at all times via the map manager, even when they are geofenced. If you have media crews roaming the route (or other team members) then it might be worth also giving them access to ensure they can easily locate participants.

Things to consider as a participant
Tracker positioning
Positioning your tracker well is always important to ensure reliable GPS performance. However, with geofencing enabled, you should also ensure that it is not positioned in a way that could accidentally trigger the button. The function button is intentionally recessed and requires holding for several seconds, but it can still accidentally be activated if the tracker is, for example, attached with a strap over the button.
dEACTIVATION IS aUTOMATIC
Remember that you only need to hold the button to activate geofencing. Deactivation happens automatically when you leave the geofenced area, so you don’t need to press the button again. All you need to do is continue onwards and our platform does the rest for you.
Timing
You can choose to activate the geofence either just before you stop or when you stop. People often prefer the former, as then their stopped location is never visible, rather than being briefly visible then hidden. If employing this approach, bear in mind that the radius is typically only a couple of kilometres, so you should press the button only a few minutes before you stop.
Useful Resources
Geofenced Participants – Support Site
Tracker User Guide (Page 9) – Tracker Instructions
Improved Geofencing Released – Blog Article